
Creating a website with Remix.run, WordPress and GraphQl

If you want to create a website for your client or a portfolio for yourself and don’t want to touch the code for editing the contents, this tutorial is for you. In this tutorial, I’m gonna walk you through creating a simple website using Remix.run and WordPress. I’ll cover these subjects in the following post:
Setup WordPress
There is a variety of ways to install WordPress on your local machine that you can look up. One of the easiest options is Local. We’ll need to install the WPGraphQL plugin, which will allow us to query data with GraphQL. Installing WPGraphQL is as simple as going to the Plugins section of your WordPress admin dashboard, searching for it, and installing and activating it.
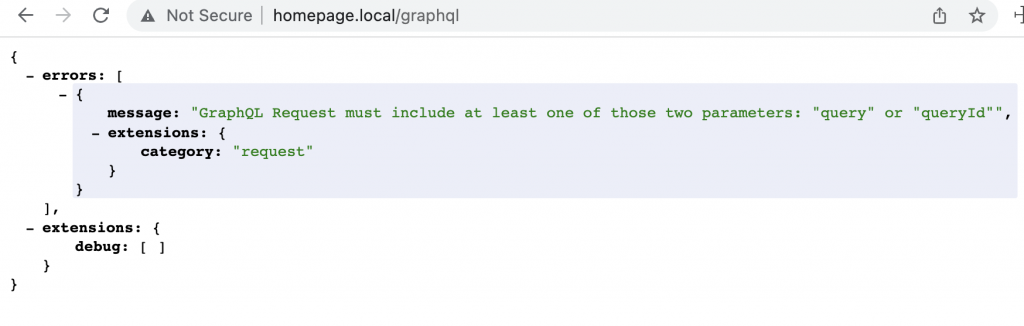
When you are ready, visit /graphql endpoint of your WordPress site, where you should see a GraphQL error, meaning we are ready to move to the next step.
Before starting our project, we’ll probably need to have some fake content for testing purposes in our WordPress– by using FakerPress you can add some Lorem Ipsum posts!
Create a Remix.run project
Now let’s create our first Remix.run project by running this command in the terminal:
npx create-remix@latestNext, it will ask you a couple of questions. You can explore different options and see how they change your project structure but for this tutorial’s purpose, I’m going with the basics.
- Where would you like to create your app? my-app
- What type of app do you want to create? Just the basics
- Where do you want to deploy? Remix App Server
- Do you want me to run npm install? Yes
- TypeScript or JavaScript? TypeScript
Open the project folder with your code editor then run Remix for the first time:
npm run devYou should be able to see the default index page on this URL: http://localhost:3000/
Create basic routes
Imagine our website would have three different pages. One would be a blog, another would be about us, and the third one would be our contact page.
.
├── blog
│   ├── post 1
│   ├── post 2
│   ├── ...
│   └── post n
├── about/
└── contact/
For the home page, you can directly edit this file: app/routes/index.tsx
The simplest way to create other pages is to create a folder for each page and an index in it. For example in order to create the blog page we need to create a blog directory with an index.tsx in it.
The final folder structure should look like this:
 /app/
    └── routes/
        ├── index.tsx → (blog page)
        ├── about/
        │   └── index.tsx → (about page)
        └── contact/
            └── index.tsx →(contact page)
Copy this to your blog page:
export default function Index() {
return (
<div>
<h1>Blog page</h1>
</div>
);
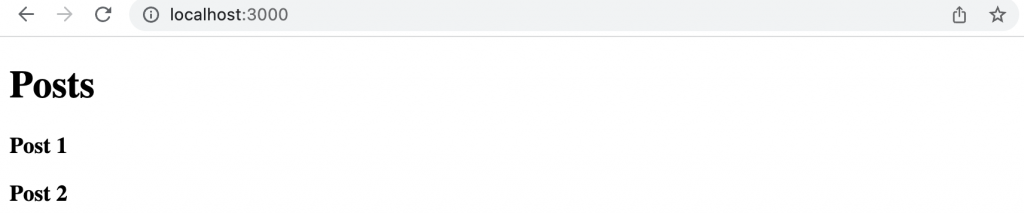
}Then you should be able to see your blog page:

Let’s make our first dynamic route for blog posts. Remix’s naming convention for dynamic routes begins with a dollar sign ($), i.e., $filename.jsx so we need a dynamic route for our blog posts based on their postId.
/app/
    └── routes/
        ├── index.tsx
            └── $postId.tsx
import { useParams } from "react-router-dom";
export default function Post() {
const { postId } = useParams();
return (
<div>
<h1>Blog post: {postId}</h1>
</div>
);
}
While this works perfectly, I have a more advanced suggestion here– WPGraphQL provides a variety of ways to query Posts, Pages, and Custom Post Types. So it’s possible to fetch your blog post based on their slug.

When you are able to query content by its slug, one might ask why should we have different routes for our pages and our blog posts? Why do we need multiple routes for the same type of routes? Well, we shouldn’t!
Let’s refactor our imaginary code structure like this:
.
└── app
    └── routes
        ├── index.tsx (posts list)
        └── $slug.tsx (single page/post/custom post type)
So much simpler than the previous structure but gives you more flexibility to have any type of content based on their slug.
Querying posts
Let’s begin with our blog page. To load data, we will use the Remix loader function, which runs on the server. In this step, I’ll return an array of mock data to demonstrate how the page works, but in the next step, I’ll fetch data from the WordPress GraphQL endpoint.
import { useLoaderData } from "@remix-run/react";
import type { LoaderFunction } from "@remix-run/node";
import { json } from "@remix-run/node";

export const loader: LoaderFunction = async ({ request }) => {
  return json([
    { slug: "first-post", id: "1", title: "Post 1" },
    { slug: "second-post", id: "2", title: "Post 2" },
  ]);
};

export default function Blog() {
  const posts = useLoaderData<{ slug: string; id: string; title: string }[]>();

  return (
    <div>
      <h1>Blog page</h1>
      <div>
        {posts.map(({ slug, id, title }) => (
          <h3 key={id}>{title}</h3>
        ))}
      </div>
    </div>
  );
}
Once the data has been loaded in the loader function, useLoaderData will return the result in the front-end so you can render it on your page.
Let’s populate our blog with actual WordPress posts. In order to do this, we need to have graphql-request installed.
npm i --save graphql-requestThen create the api folder and add the following file to it.
import { GraphQLClient, gql } from "graphql-request";

export const graphql = new GraphQLClient("https://blog.ahandani.com/gq");

const GET_POSTS = gql`
  query getPosts {
    posts (first: 20, where: { orderby: { field: DATE, order: DESC}}) {
      nodes {
        id
        title
        slug
      }
    }
  }
`;

export type Posts = {
  nodes: { id: string; title: string; slug: string }[];
};

export const getPosts = async (): Promise<{ posts: Posts }> => {
  const data = await graphql.request(GET_POSTS, {});
  return data.posts;
};
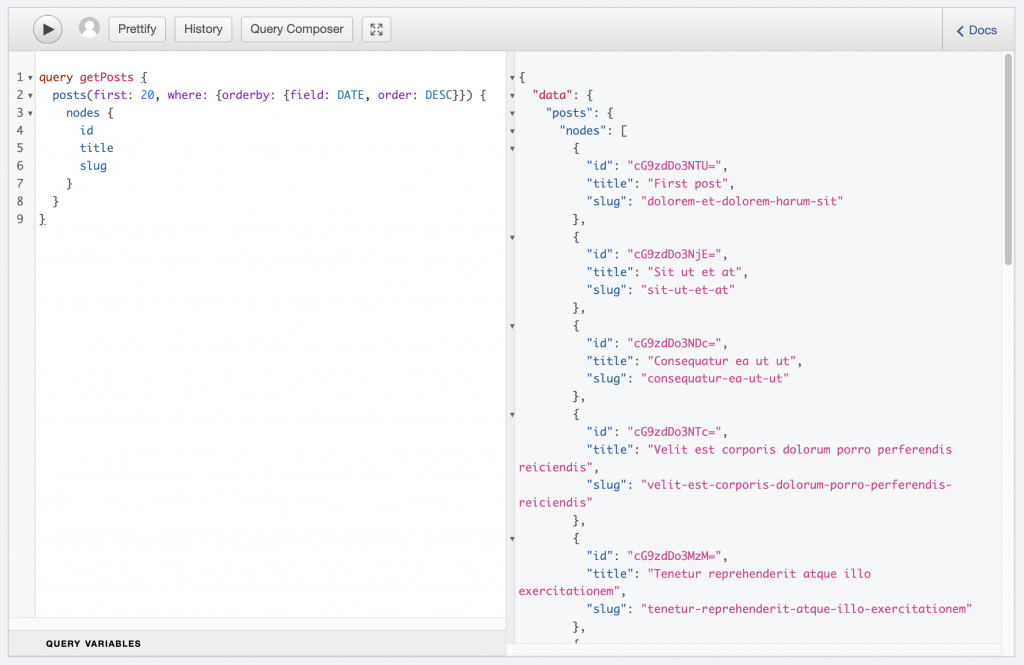
At this point, we’ll define our GraphQL queries that will define the data we want back from WordPress. The first 20 results are pulled from all posts and ordered by descending date order.
The following image shows WP GraphQL IDE’s result from the same query as above:
The getPosts is our data handling function and we need to import it to our blog posts page where we want the list of our posts to be shown.
import { useLoaderData } from "@remix-run/react";
import type { LoaderFunction } from "@remix-run/node";
import type { Posts } from "~/api/getPosts";
import { getPosts } from "~/api/getPosts";

export const loader: LoaderFunction = async ({ request }) => {
  return getPosts();
};

export default function BlogPosts() {
  const posts = useLoaderData<Posts>();

  return (
    <div>
      <h1>Posts</h1>
      <div>
        {posts.nodes.map(({ slug, id, title }) => (
          <a href={slug} key={id}>
            <h3>{title}</h3>
          </a>
        ))}
      </div>
    </div>
  );
}
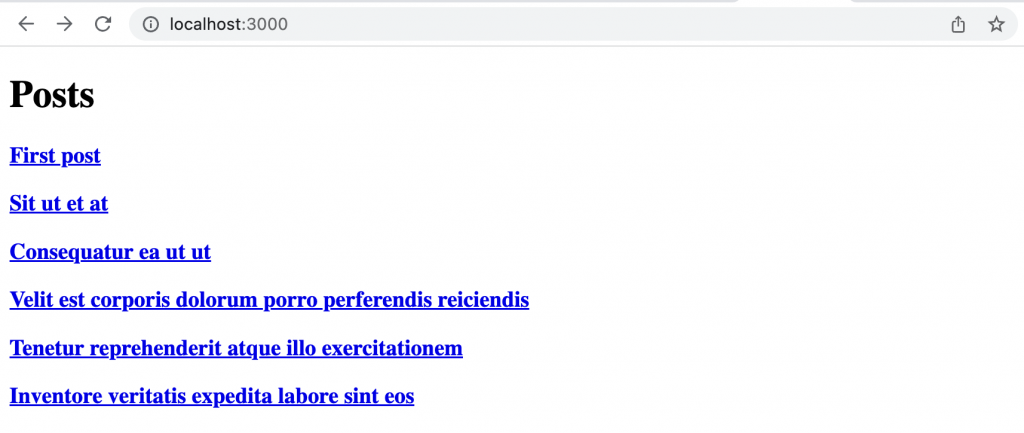
You should see a page that looks like this:
Querying a single post by slug
As you can see in the previous section we linked all the titles by using slug to our single content pages. Now, we will use GraphQL to pull data for a single Post item. When you are viewing a single blog article on the $slug.tsx page, the getPost method will be called. This method uses a GraphQl query which uses a variable to find the specific content with the type Post we want to fetch data about.
import { GraphQLClient, gql } from "graphql-request";

export const graphql = new GraphQLClient("http://homepage.local/graphql");

const GET_POST = gql`
  query getNode($slug: String!) {
    nodeByUri(uri: $slug) {
      __typename
      ... on Post {
        id
        title
        content
        date
      }
    }
  }
`;

export type Post = {
  __typename: "Post";
  id: string;
  title: string;
  date: Date;
  content: string;
};

export const getPost = async ({
  slug,
}: {
  slug: string;
}): Promise<{ post: Post }> => {
  const data = await graphql.request(GET_POST, { slug });
  return data.nodeByUri;
};
And again you can simply render your data in your view. This time the loader function (which runs on the server) passes slug to getPost method.
import { useLoaderData } from "@remix-run/react";
import type { LoaderFunction } from "@remix-run/node";
import type { Post } from "~/api/getPost";
import { getPost } from "~/api/getPost";
export const loader: LoaderFunction = async ({ params }) => {
const slug = params.slug;
return getPost({ slug: slug as string });
};
export default function BlogPost() {
const post = useLoaderData<Post>();
function createMarkup() {
return { __html: post.content };
}
return (
<div>
<h1>{post.title}</h1>
<div>
<span>{post.date}</span>
<div dangerouslySetInnerHTML={createMarkup()} />
</div>
</div>
);
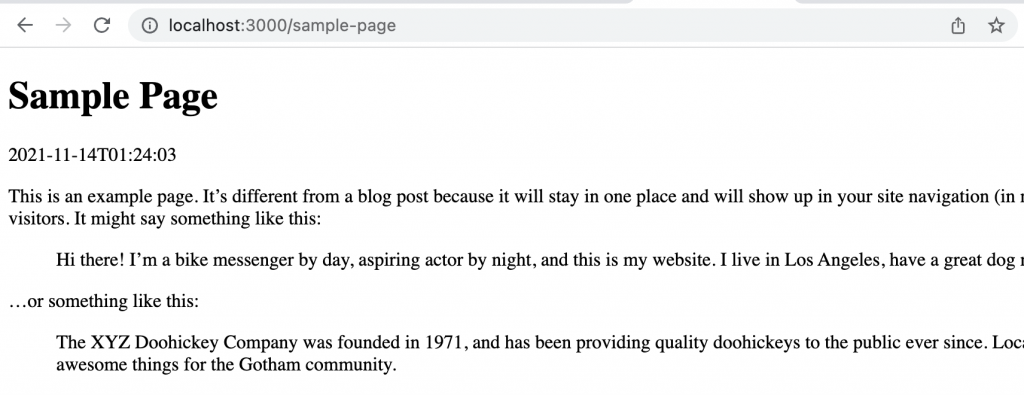
}What about pages?
Obviously, we should follow the same process for pages as we did for single posts. But here I don’t believe we need another getPage method. This could be done just by a simple refactor on our getPost method by renaming it to getNode and applying these changes:
import { GraphQLClient, gql } from "graphql-request";

export const graphql = new GraphQLClient("http://homepage.local/graphql");

const GET_NODE = gql`
  query getNode($slug: String!) {
    nodeByUri(uri: $slug) {
      __typename
      ... on Post {
        id
        title
        content
        date
      }
      ... on Page {
        id
        title
        content
        date
      }
    }
  }
`;

export type Node = {
  __typename: "Post" | "Page";
  id: string;
  title: string;
  date: Date;
  content: string;
};

export const getNode = async ({
  slug,
}: {
  slug: string;
}): Promise<{ node: Node }> => {
  const data = await graphql.request(GET_NODE, { slug });
  return data.nodeByUri;
};
Now we can simply fetch two content types with one method and render them on one route.
import { useLoaderData } from "@remix-run/react";
import type { LoaderFunction } from "@remix-run/node";
import type { Node } from "~/api/getNode";
import { getNode } from "~/api/getNode";

export const loader: LoaderFunction = async ({ params }) => {
  const slug = params.slug;
  return getNode({ slug: slug as string });
};

export default function ContentNode() {
  const node = useLoaderData<Node>();

  function createMarkup() {
    return { __html: node.content };
  }
  return (
    <div>
      <h1>{node.title}</h1>
      <div>
        <span>{post.date}</span>
        <div dangerouslySetInnerHTML={createMarkup()} />
      </div>
    </div>
  );
}
What’s next?
With WordPress and Remix.run handling every aspect of the project, we have a lot of options as to where we go next. What I have done in this post was an inspiration from this repository which I created to build my personal website. You are welcome to fork this project if you wish to learn more about this concept and explore a working project built with Remix and WordPress.